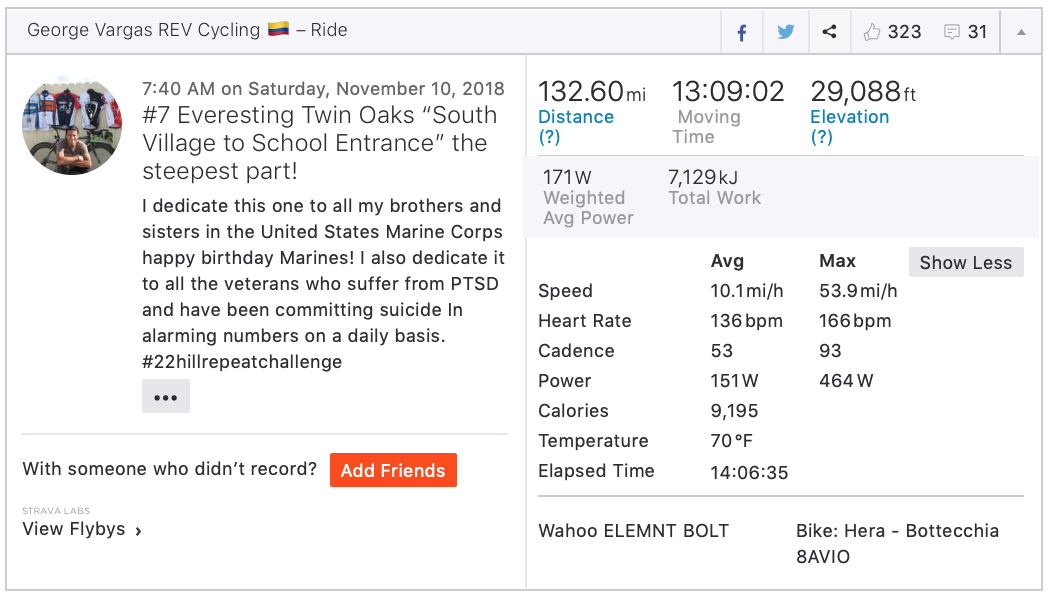
As a four-time successful Everester I often field questions from riders aspiring to complete their first Everest. I thought it would be a good time to create a series of posts to help riders prepare, ride and complete their first Everest. It is my belief that even an experienced Everest rider may glean something for their next event. Below is a quick summary of my four successful Everests. For the uninitiated Everesting is take a hill or mountain and doing repeats on it until you reach 29,029 feet in one ride. I think it is important for me to mention that I am 4 for 4 on my Everests. I owe this to my meticulous planning, training and extensive reconnaissance.

Here are my top 10 tips for a successful Everest
- Believe you can do it
- Preparation
- Reconnaissance
- Location location location
- Nutrition
- Gearing
- Support system
- Equipment
- Redundancy Backup
- Believe you can do it
Let’s take a little time to dig into each of these 10 bullet points.
BELIEVE YOU CAN DO IT
The single most important thing you can do is get your head prepared for the tough journey ahead. There is planning and preparation and most likely additional costs to acquire Everest specific gear. But those things while appearing exigent a much higher priority is to begin the positive inner monologue. It should begin with something like this, “I am going to complete an Everest — no matter what it takes”
You may derive your mental toughness from various sources. One of which may be your prior experiences. It helps to have suffered during previous hard endurance events in any other sport and it would be a bonus if it were in cycling. During your training you develop mental toughness as your training rides get harder and harder.
PREPARATION
Training is key. Train often, and train with a purpose and pay attention to not overtrain. No need to complete a 20,000 foot day of climbing to feel prepared for your Everest. While that seems obvious I purposely wanted it to sound ridiculous.
Some riders are just wired that way though — they feel they need to do 100 mile training rides to feel prepared to do a 112 mile Ironman bike leg. But I contend that athletes should train less and rest more. The reduced level of training volume should be performed at higher intensity. I feel strongly that a hard 50 mile ride is all you need to train for a century, hard “I can barely breathe” 75-80 milers are all you need to complete a Double Century. For Everesting, I believe a really hard 10,000 foot climbing day or an easy paced 15,000 foot climbing day is more than enough.
Training specificity is indispensable in your pursuit of a successful Everest. In other words, climb, climb and climb some more. If the potential Everest site is local then train on that hill or mountain. While working on your physical preparation, run a parallel training program for your mental preparation.
RECONNAISSANCE
A vital and critical step in your preparation is to perform a recon of the climb. Consider the following:
- Traffic patterns
- Traffic itself
- Bike Lane or shoulder
- Stationary SAG vehicle
- Mobile SAG
- The arc of the Sun during your Everest
- Wind pattern
- National, State or City park
- Bathroom Facilities
- Road Conditions
1. Traffic Patterns – is the location effected by rush hour? Steady traffic throughout? Is there more traffic during the day or at night? Your typical Everest will be at least 12 hours and as much as 24 hours. Being aware of the traffic patterns may help your strategy for your event.
2. Traffic – Will you choose a remote climb or one in a residential area? Or ideally an area that completely eliminates traffic all together.
3. Bike lane or shoulder – while I do believe that a bike lane can lull you into a false sense of security they do serve their purpose. On my first Everest the nearly 12 mile mountain climb had a very narrow shoulder and that shoulder had a rumple strip which consumed more than 50% of it. I will put it mildly by saying it sucked and it is poor planning by California Transportation Department. Climbing this mountain in the middle of the night was nerve-wracking and sometimes terrifying. Hence I know do my Everests in residential areas.
4. Stationary SAG vehicle – Look where you can park your SAG vehicle close to the top or bottom of your chosen location. For all four of my Everests I was able to park my car very close to the segment. Three of the four times it was at the bottom of the climb and one time at the top. Having your supplies really close by is a huge comfort to pushing yourself to the limit. Simple things like a place to keep your cooler, your clothing, your night and cold weather clothing and reflective equipment. Your SAG vehicle can provide warmth, cooling or shelter from a rain storm. It is key to have your SAG if/when the weather turns for the worst. if you are able to jump in your vehicle for few minutes at a critical time it can save your ride.
5. Mobile SAG – Let’s get one thing out in the open straightaway if you will have friends or family members SAG for you thank them profusely before, during and after. You will need to consider their ease to support you without obstructing traffic flow. Will they provide direct follow support during the evening or leap frog support?
6. The arc of the sun can play a critical role to your success. Will you be roasting under the sun the whole day or will you have shade? Will you be climbing directly into the sun? This is an obvious safety issue as motorists coming up behind you may be blinded by the setting sun and not see you on the road.
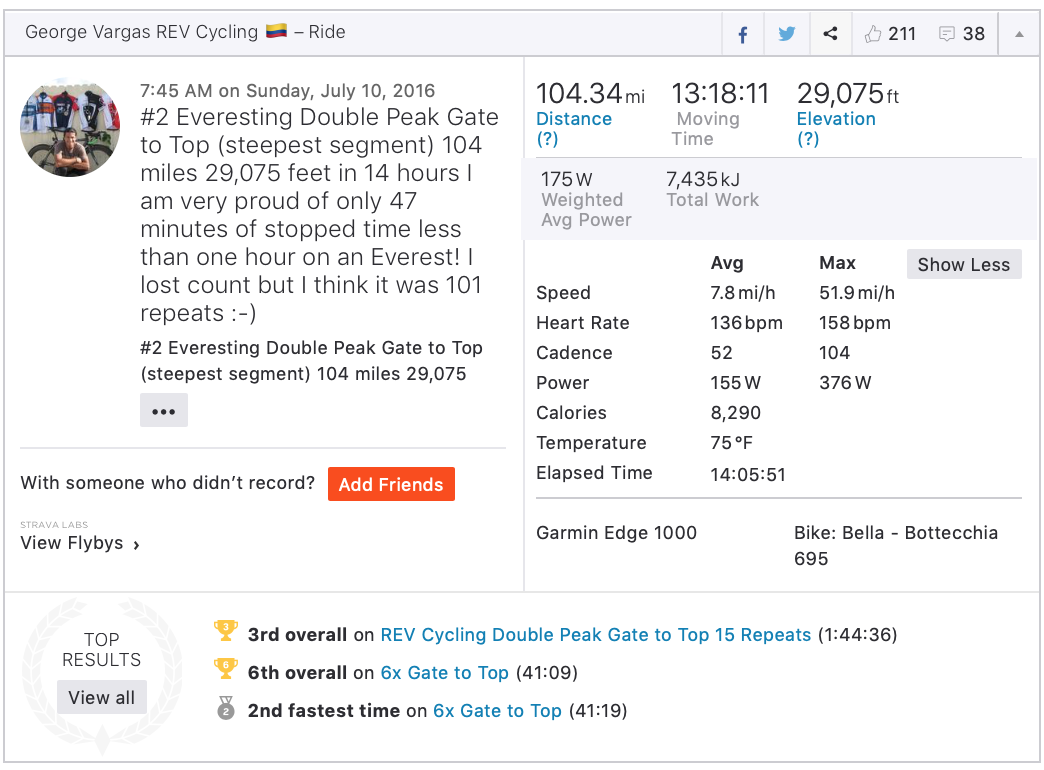
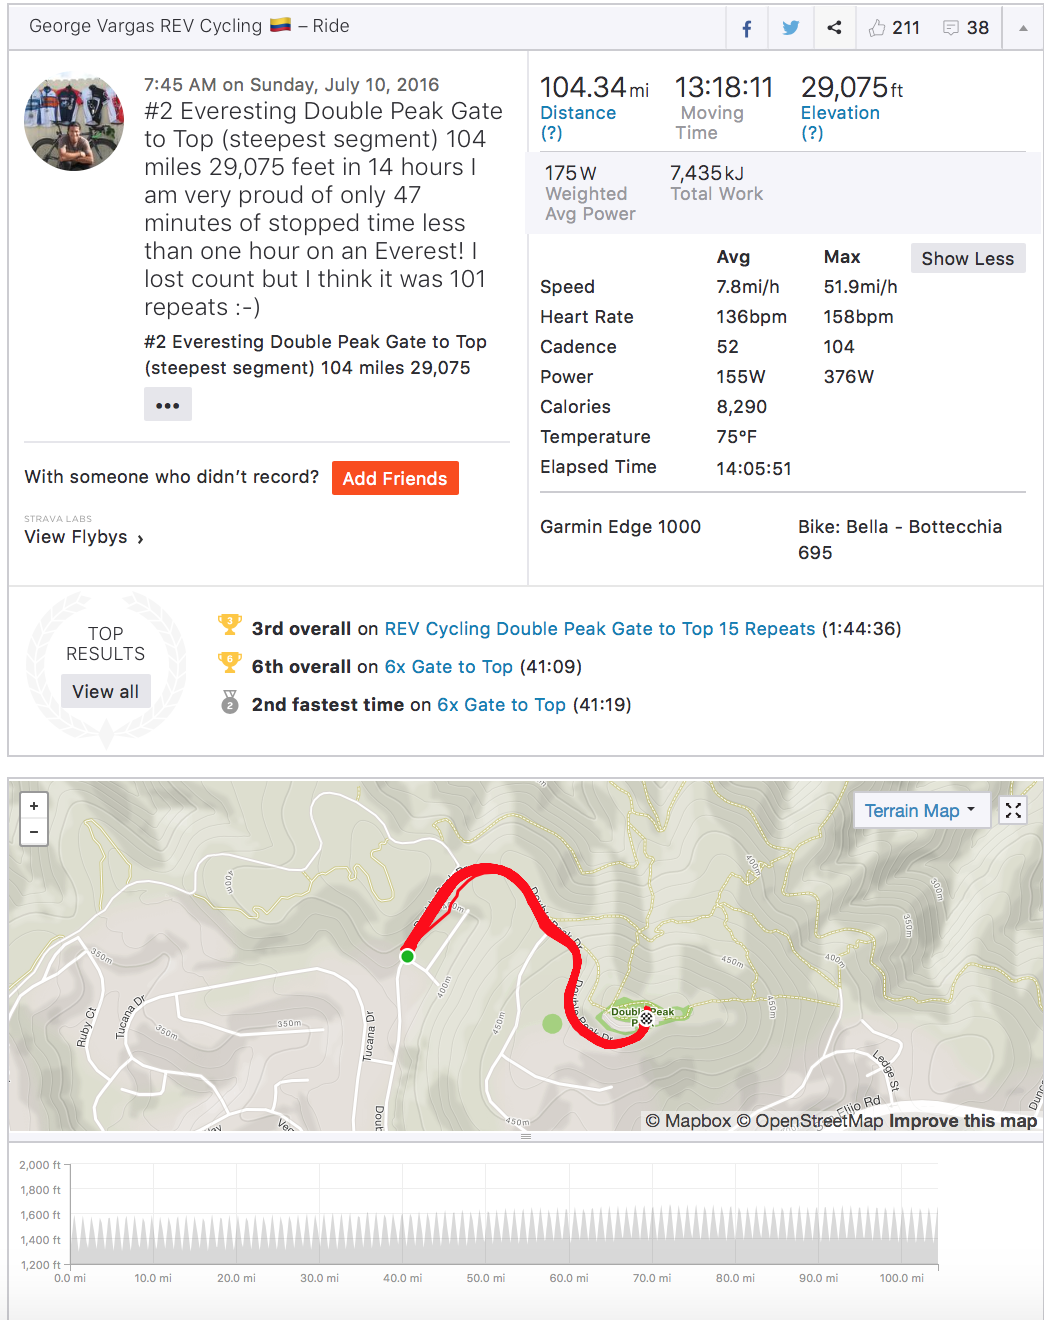
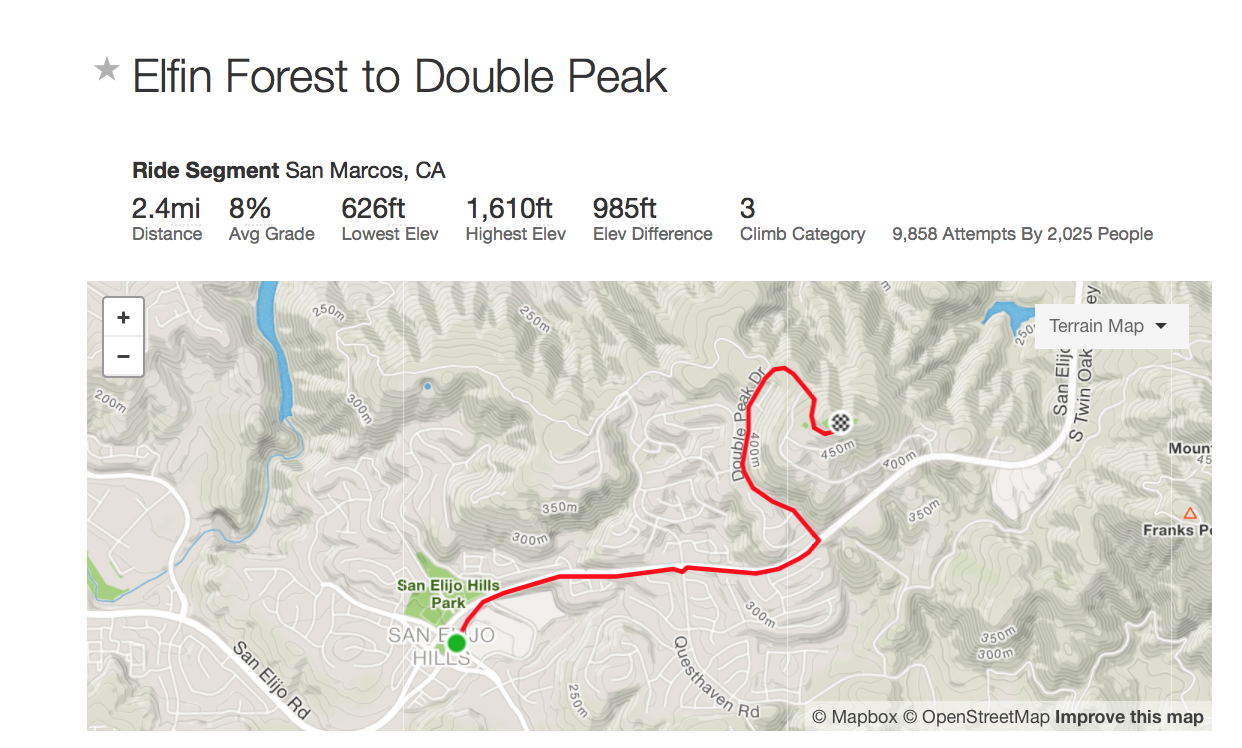
7. Wind Patterns – will you have head, cross or tailwinds on your segment? What time during your Everest will these wind patterns appear and will they impact your ride? A summer Everest gives you a lot of daylight to complete your Everest. However, here in San Diego a summer Everest in a remote area with low traffic means you may be in the foothills of the mountains or the mountains themselves. In the summer it can be 90-110F degrees in the middle of the day. If you happen to have a tailwind in the middle of the day for several hours you will definitely feel much hotter and need to consider more hydration supplies for your event. During my second Everest — Double Peak Summit it was July and it was really hot for several hours while I was climbing a 15% grade at 4 mph over and over again.
8. National, State, County or City park – pay attention to park hours. Most parks hours are sunrise to sunset. Keep in mind those daylight hours when doing your recce. Consider padding 1-2 hours to your total time because things can and will go wrong and you may need a little extra time to get this done. Nothing is worse then riding an Everest under the pressure of a time constraint.
On the other hand, a park might be a good choice if you can incorporate it into your route. Things like running water, parking for your vehicle and/or a good place to stash your supplies.
On my second Everest, Double Peak Park Road. To date this was by far my best Everest location. There was a bathroom and a water fountain at the top of a 11-15% hill. My car was parked at the bottom. The climb was about 7-8 minutes the descent was about 90 seconds. I had access to SAG on either end.
9. Bathroom Facilities – It would be very good and a nice bonus to have running water and bathroom facilities. If this is not possible you can buy a camping style potty

10. Road Conditions – some pavement or rough pavement. Something so simple can make such a huge difference in your Everest. Say for example you have rough pavement, tree roots jutting through the pavement (always in the bike lane right?) or potholes… you might want to consider wider tires or lower tire pressure or both. The constant vibration through the frame and handlebar will wear on you — maybe the stiff superlight climbing bike wouldn’t be the right choice. Sure you are climbing 29,029 feet 8,848 meters but maybe your comfortable bike that has better tire clearance might be the better choice albeit a tad bit heavier.
LOCATION LOCATION LOCATION
I could spend an entire post on segment selection and I still might. The old saying in real estate is even more true in Everesting The most significant thing you can do is choose the perfect hill. Perfect is relative to each rider. For example, my preference is a hill to be steeper than 8% grade preferably 10%. This ensures a shorter time and distance which will reduce the overall wear and tear on your body. Average grades of 4-6% are going to extend your time on the bike. A 200 mile Everest is just not appealing to me. Please do yourself a favor and find a good steady 7-8% grade hill. You will be happy in you did so. In my humble opinion, a steeper grade with less repeats and less overall time spent on the bike is easier than a shallow grade and more repeats. Trust me spinning is completely overrated. Once you are on the same climb for 12 plus hours on that shallow grade you will not be “Spinning to win” any longer.
There is enormous physical fatigue in Everesting but one thing I have found that is very important to me is to see the rapid accumulation of total gain during the first 10,000 to 15,000 feet. Subsequently, the rapid reduction of gain needed in the last 10,000 feet is also comforting. When physical fatigue sets in nothing effects me maintaining my mental edge more than anything than climbing and climbing and I feel like I haven’t gotten any closer to my 29,029 ft goal.
Having stores nearby can be a nice treat. You may run out of supplies and can send a friend to run an errand for you. I ran out of ice on a very hot day and a friend was able to fetch additional ice for my cooler. You may have a craving for something other than what you packed for your event.
Bathroom facilities at a gas station, fast food or a public facility is also a nice treat.
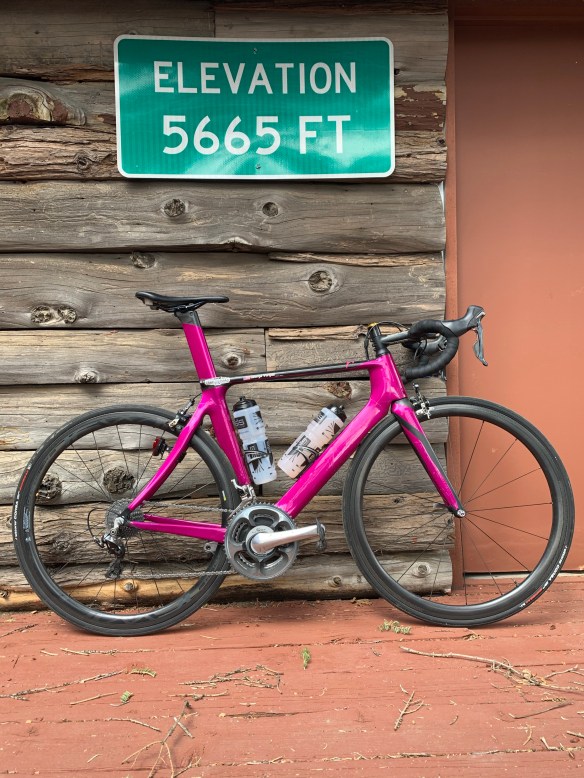
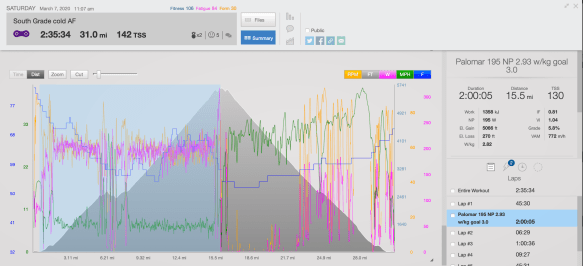
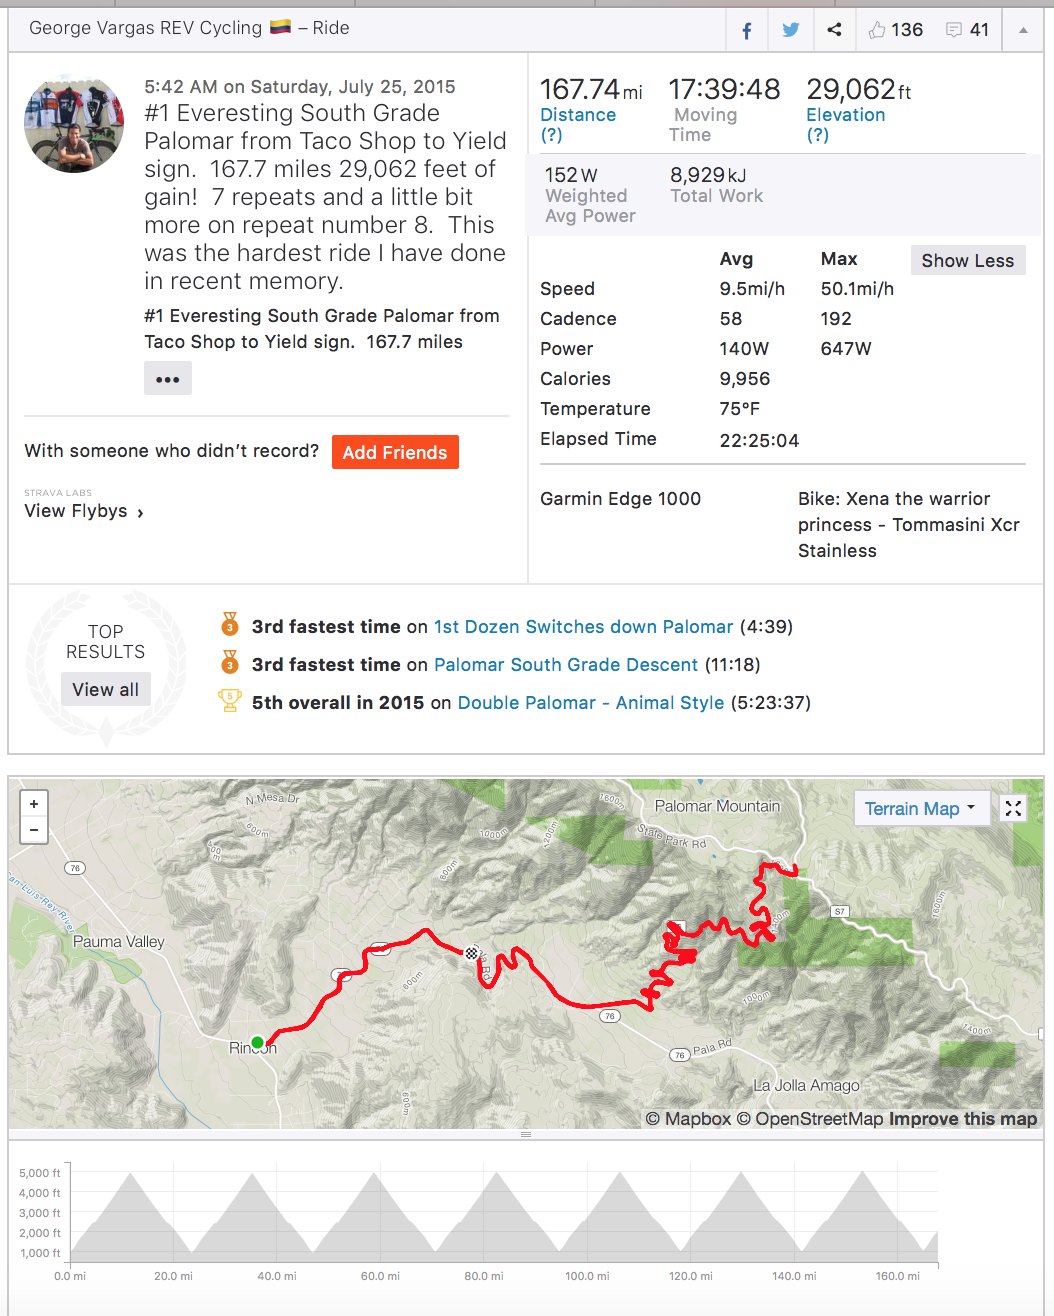
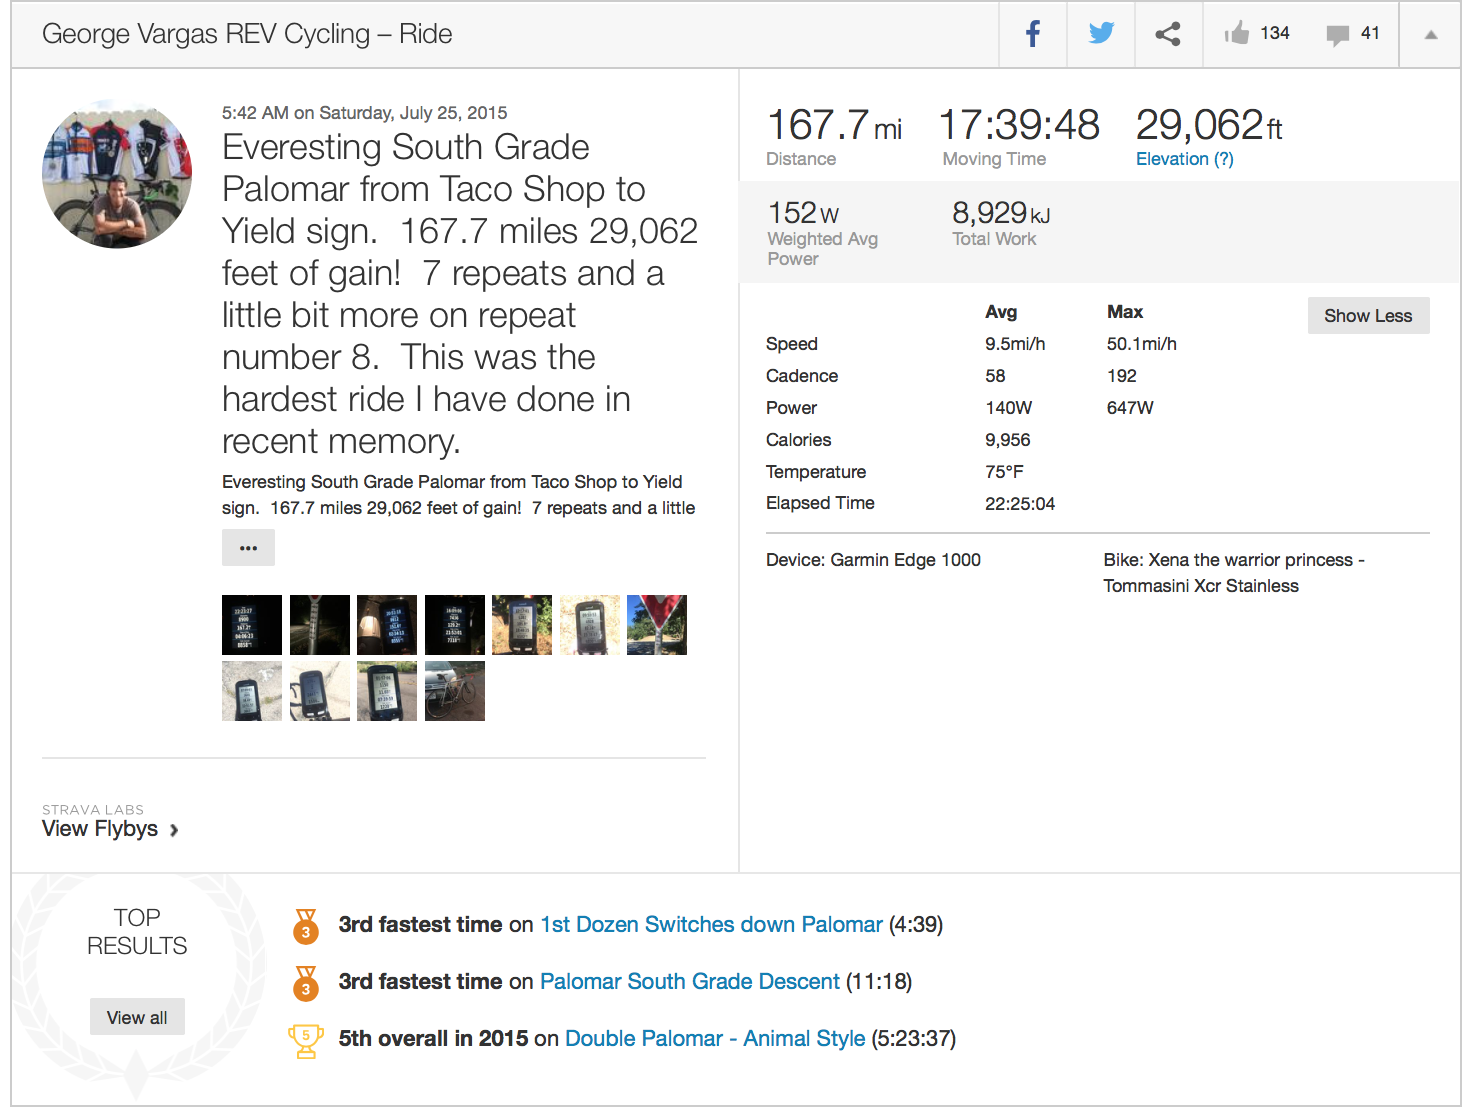
The length of a climb is a crucial element for your success. My first Everest was South Grade Palomar Mountain – the most iconic climb in San Diego County and arguably all of Southern California. The climb is 11.6 miles with 4,200 feet of gain (6.7% grade) here is the South Grade Palomar Strava Link to the segment. 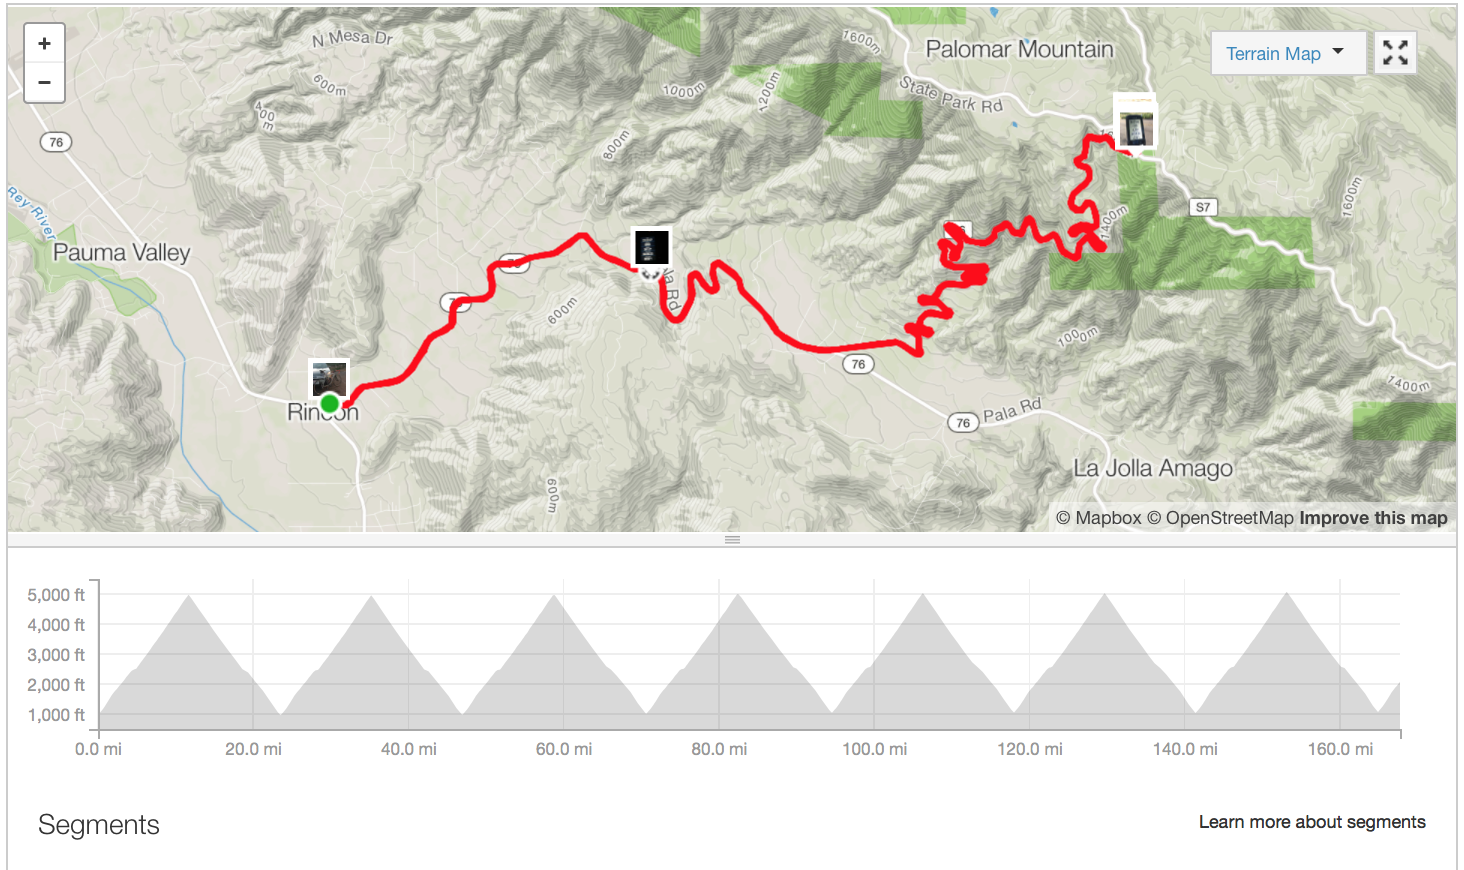
One of the issues I had with this segment was that it was an epic climb. Just one ascent up South Grade Palomar is an epic day on the bike. For most locals there are two common departure points – A coastal departure from a beach city such as Encinitas, Solano Beach or Del Mar round trip is about 100 miles with 10,000 feet or Kit Carson Park in Escondido for a 60 ish mile and 6,000 foot day.
Seven repeats of an 11.6 mile climb turned out to just be too much by repeat number 7. The 7th repeat took twice as long as the previous 6 repeats – from an average of 2 hours to over 4 hours.
Since my first Everest I have kept my preferences of Everest locations to distances of 3 miles or less with a focus of segments of 1 mile or less. The shorter steeper segments allow for fast accumulation of gain and an shorter total time for your Everest.
Refer to the Reconnaissance section because many of the things that make an ideal location will encompass many of criteria I mentioned.
An odd thing to consider is will you cause suspicion being in the area you are performing your Everest? For example, when I performed my 77.8 mile Everest with 29,203 feet I was in a residential neighborhood. As I was loading up my bike and changing from cycling clothing to street clothes I was accosted by a local sheriff’s deputy. He said he was responding to a call from a resident/s that some guy was going up and down the hill and swerving all over the place. The grade was over 15% and anytime I reached for my water bottle my line wasn’t perfectly straight but to call it swerving all over the place would be a hyperbole. Once I told him what I was doing and that I was done and leaving anyway he said he was just going to call it in and I was free to go. Interestingly, I told him I was Everesting and he did an internet search in his squad car laptop lol!
NUTRITION
This topic is so personal and so polarizing that just the very mention of it will elicit 10 different responses from 10 different athletes. I suffered from nutrition issues for years until about three years ago. I then discovered a liquid nutrition product that is a complete meal replacement, packed with carbohydrates, protein, fat, electrolytes, vitamins and minerals. If you would like a recommendation on the nutrition product I use you can contact me privately. However, every nutrition plan should cover these basics:
- I prefer liquid nutrition for an Everest.
- Bare minimum of 250 calories per hour
- Protein sources
- Variety
- a guilty pleasure or two or three
- Conscience decision to deviate from your off the bike diet principles
1. I prefer liquid nutrition for an Everest.
This is a personal thing. I prefer liquid fuel because I can ride and fuel at the same time. Stopping to eat solid foods such as bars, gels, sandwiches etc will extend your total Everest time. I will continue to stress the importance to keep moving all the time and reduce the total Everest time. Additionally, I prefer really steep Everest and eating solid foods while rolling is quite difficult especially in the later hours of your event. Drinking your calories is much easier as you are climbing a 10-12% and descending at 40+mph. The jury is still out whether liquid fuel is easier to digest than solid foods while exercising but from my personal experience I feel less full and less lethargic and better fueled while using liquid fuel.
2. Bare minimum of 250 calories per hour
Depending on your weight you should target at a minimum 250 calories per hour. There are several online formulas to assist you in finding the ideal calories per hour for your gender, weight, body type and exertion level. The more calories you can digest per hour the greater the probability is for your success and the better you will feel during your Everest. Personally, I target 285 to 300 calories per hour when I Everest. I am 5’9″ and weigh 150-155 lbs.
3. Protein sources
While carbohydrates are an obvious and essential forms of energy for endurance events I am surprised how often I have to advice an aspiring Everest athlete to include protein in their event day nutrition plan. Protein satiates your hunger, prevents muscle cannibalization, gluconeogenesis, which is the synthesis of glucose from the fatty and amino acids of lean muscle tissue. Adding protein to your nutrition plan will assist you in performing a successful Everest.
4. Variety
Personally I use just one primary liquid fuel but there are several things that I will have in my SAG vehicle and cooler… just in case. Fresh fruits, Pretzels, Salty and savory or sweet times for variety.
5. A guilty pleasure or two or three — Coca Cola, Potato Chips (Salt and Vinegar are my favorite) anything that makes you feel good that you wouldn’t ordinarily eat off the bike.
6. Conscience decision to deviate from your off the bike diet principles. I have been approached by athletes with special off the bike diets. Vegetarian or Vegan athletes have strict diets and ideology. Sometimes I offer them options that go against their preferred diet and they choose to deviate in lieu of not completing their Everest.
GEARING
Gearing choice will be decided based on your perfect hill. I ride a compact crankset 50/34 and an 11-32 Cassette when the grades are over 10%. For example, the the Coronado Hills Everest which was 77.8 miles on a 15% grade the 50/34 and 11-32 cassette was perfect. However, I prefer 8-10% grades for my Everest so that means a standard 53/39 crankset and 11-28 cassette. You choose the gearing YOU are comfortable with finishing an Everest. If you recon the climb you will know what you need then add 4 more teeth to your cassette — just in case 🙂
You can also purchase a crankset that is being called a micro compact crankset that has a 48/32 chainring combination and even a 46/30 . This crankset might be a personal consideration for me as I prefer really steep grades. At the time of this writing, I currently hold the record for the shortest distance Everest in North and South America at 78 miles and 29,203. To accomplish this incredibly low mileage Everest I found a hill that was 1/2 mile and was over 15% for the majority of 1/2 mile. The average grade came out to 14.3% because there is a lessening of the grade at the top as it makes a right turn to a connecting street.
It goes without saying that your bike should be properly tuned. That little nagging click click early in the event might be ok but later in the day/night it can be really annoying especially if the bike refuses to stay in gear.
SUPPORT SYSTEM
You may be able to cajole others to join you for a portion or the entire event. If you prefer a solo effort, my personal favorite, you will at some point during your attempt seek out support. Your support may manifest itself in many different forms for example, it could be validation from your social media network. Posting pictures with status updates to Facebook, Instagram or Twitter are not only an opportunity to validate your effort but these practices are encouraged for documentation purposes, more on documentation in point number 9.
I have had a rider or two join me for a few repeats at their own pace and their mere presence for a short time was comforting. However, Everesting is a personal journey that I wish to take, suffer through it and come out the other side knowing I accomplished something great on my own. But as I have been reminded many times through my 14 year ultra cycling career — no one is ever alone on a solo effort.
Here’s another take on the support system. When I first started doing longer and longer events one of the things I used to do was tell my friends that I was training for something epic. Then during the event I replayed those conversations in my head. These conversations were important because they held me accountable. I never wanted to come home and see those friends and have to tell them I Did Not Finish (DNF) said event.
EQUIPMENT
Depending on the weather or the projected length of your Everest several items need to be included as part of your gear list. I will cover the GPS related items in the next segment point number 9 Redundancy Backup.
Weather – extreme cold or hot conditions should be avoided at all costs.
Clothing- arm coolers, arm warmers, knee warmers, leg warmers, vest, base layer(s), jacket, long sleeve jersey,
Bottles – how many?
Lighting– bright for traffic to see you in a well lit area where a driver has many different light sources – street lamps cars business lights or low light in a remote area since your eyes will adjust and you don’t need bright headlights.
Have multiple headlights and taillights available for your event.
While repeating at night save your night vision- look down at the fog line so you can preserve you night vision which takes minutes to regain if you stare into the headlights of oncoming cars.
Battery power — the need for supplement battery sources for all your electronics can not be overstated. Cell phone, GPS device, Head lights, taillights and anything else you wish to have with you.
REFLECTIVE GEAR, LEG BAND, vests, lighted vests.
Sunglasses multiple lenses possibly
night glasses — think of your eyewear as eye protection
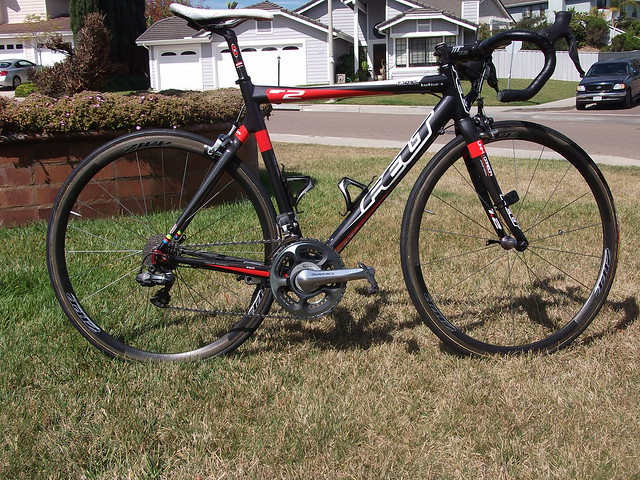
Leave the ridiculous carbon clincher or worse carbon tubular wheels at home. Use your low profile aluminum training wheels. The reasons are fairly obvious but maybe I will spell them out so we are on the same page.
- Wind conditions – no need to be riding deep section wheels (anything above 35mm) on windy days especially cross wind descents.
- Most carbon clincher wheelsets over 35mm weigh more than a nice set of aluminum climbing wheels like a Shimano Dura-Ace C24 wheelset
- Brake pad/rim – heat build up on steep descents
- Breaking a spoke on a low spoke count carbon wheel will put your wheel completely out of true.
- If you choose to ride carbon wheels bring a spare set of Aluminum clinchers as a back up.
REDUNDANCY OF DATA
You know what they say, “If it’s not on Strava it didn’t happen” – a truthful quip. You will need to provide digital proof of your Everest. There is another saying that applies here as well “Pics or it didn’t happen”. Let’s expound on these two points further.
Strava is the primary source of digital proof of your Everest. Choosing a GPS device that uploads to Strava is not that difficult since just about all newer units are now compatible. More important in my opinion is the battery life of said unit. As a bike store owner, I have access to the latest and greatest GPS devices. Unfortunately, as the unit manufactures add more and more bells and whistles the battery life of these units has decreased over the years. As an Everester the last thing you need is mapping functions on your GPS device. You are on ONE hill doing repeats that’s it. Color screens, big giant displays and so on are completely frivolous and the guilty culprits of battery draining.
Photos are great ways to get people behind your effort. Your photos on social media may motivate you when you see the comments. Heck you might inspire and motivate other riders as well. Pragmatically, photos provide another form of documentation that you completed your event. Take pictures often of the data on your GPS device.
My recommendation you should have two GPS devices so you have a back up file. Strava app on your smartphone can be your third device. In certain areas, like around my store, the Strava app will over-inflate your actual gain, which I guess would shorten your time Everesting but will fall suspect to data scrubbing FOR FACTUAL GAIN.
BELIEVE YOU CAN DO IT
Now that you have read all the tangible things that you can do to have a successful Everest we come full circle to mental preparation. In the end it is your mental strength that will get you through your Everest. When all other things fail such as your nutrition plan or your external battery isn’t charging your lighting system, you need to believe you can finish what you started. When you have fallen off your goal pace — stay focused and think of all you have accomplished up to that point. When you goal time for your total Everest comes and goes by remain positive that you are still able to ride your bike past the point when you thought you would already be finished. When the weather turns for the worse and you didn’t prepare for it with the proper clothing just keep pedaling. Remember at some point or many points in your Everest it is no longer physical… it is mental!
While on the subject of mental strength let’s discuss start times. I have had several aspiring Everest riders telling me that they will be starting at 11pm or 2 am. Personally, I could never understand why anyone would want to do that. I usually start my Everest at 7 or 8 am and ride through the day and finish at night. I prefer to spend the lion’s share of my Everesting during daylight hours and the last bit of it at night. As an Ultra Cyclist I have ridden many times through the night and I actually like riding at night. But for an Everest I prefer not to do an overnighter.
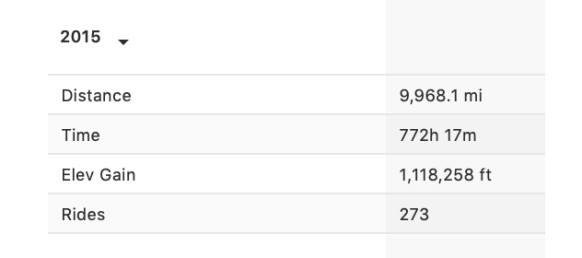
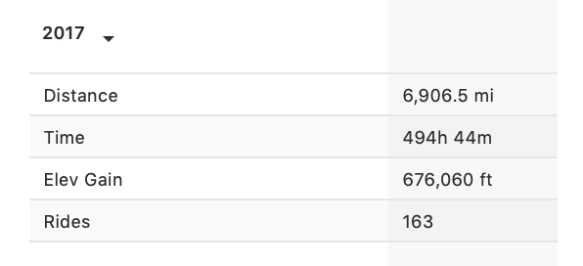
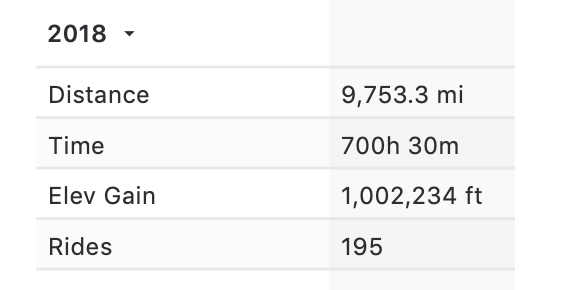
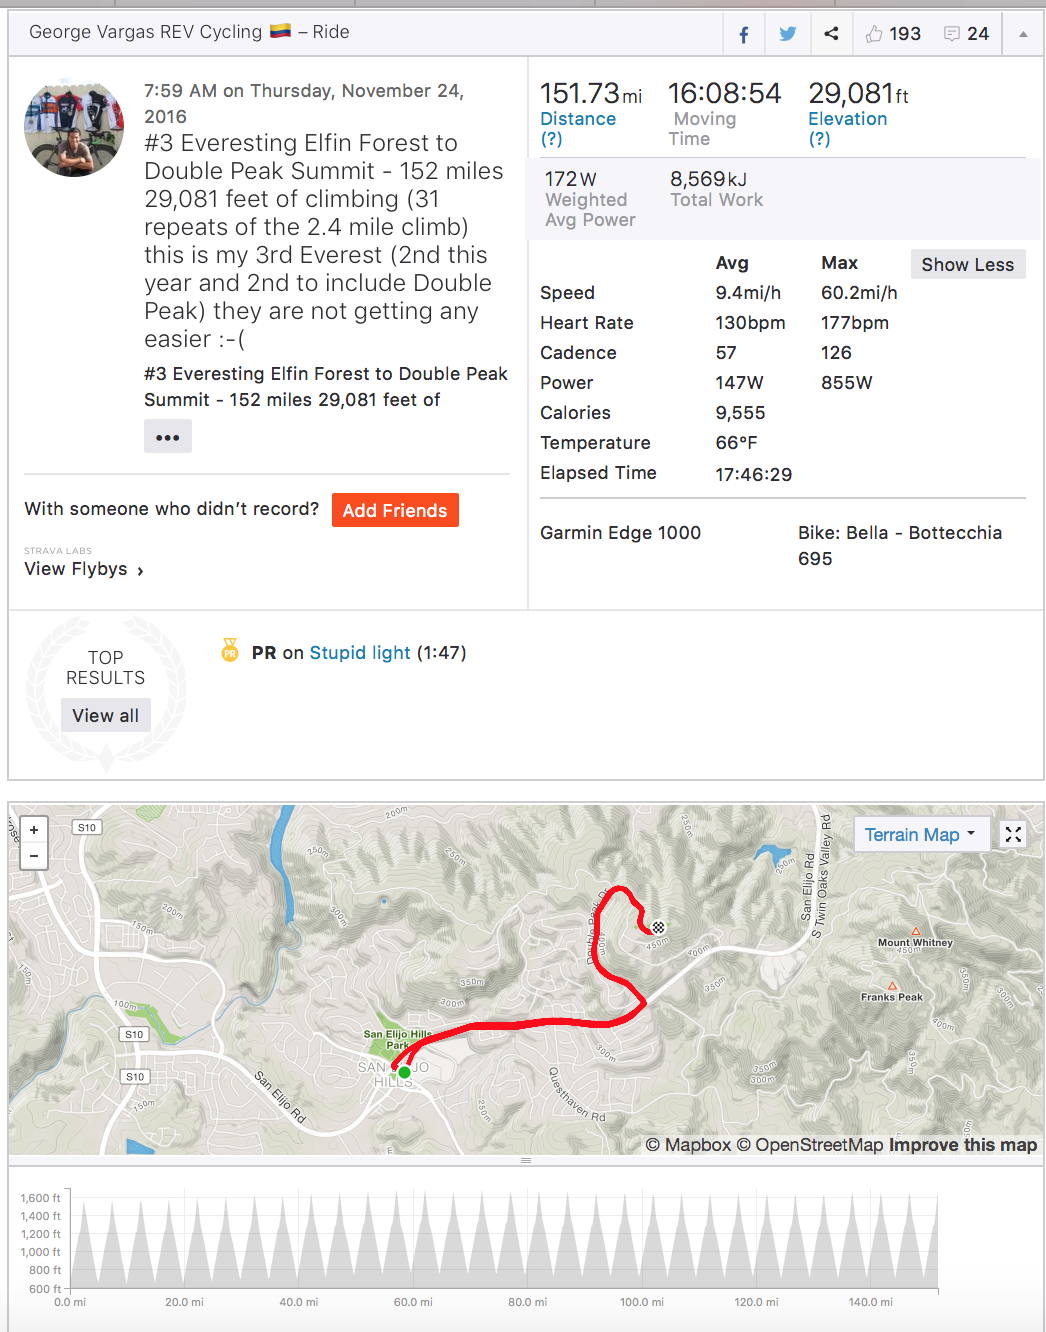
On my third Everest on Thanksgiving Day, I rode almost half of it during the day and half after dark. In San Diego the sun sets about 430 pm during the winter. It was not the best time of year to perform an Everest. I was running out of time in the calendar year to reach a 1,000,000 feet hence I did an Everest to get a quick 29K towards my goal.

There are riders who focus on the physical challenges of Everesting but I maintain that the riders that are successful at Everesting are those that work on the most important muscle — their brain. The ability to suffer physically is a practiced art of masochism which ultimately does have it’s limitations. But are those really your limit? But I asseverate the best push through those perceived limitations and find new boundaries of what really is possible. When you are able to use your mental strength and channel it – your power is limitless!
Thank you for taking the time to read my blog. If you like the content please subscribe and share it with a friend. Please leave a comment or question. You can follow me on Strava here Lastly, if this post was helpful towards your first or any Everests please come back and post a comment. Suggestions are also welcomed.
#everesting #everestchallenge